
Using FeedLog
Every page in this section, on one page. Useful for reading straight through, or for handing the whole section to an LLM in a single fetch.
Individual pages are the canonical, indexed versions — this aggregate is noindex so the two do not compete as duplicate content.
Getting started
An organization is your workspace on FeedLog. Your boards, feedback, roadmap and changelog belong to it, and it determines the portal address your users visit. This page covers creating an account, setting up an organization and preparing a portal for your users.
This page describes FeedLog Cloud. A self-hosted installation has no signup step: running the migrations creates the workspace. If you are self-hosting, start with Self-hosting overview, then continue from Put the entrance on your site.
Create your account
Go to auth.feedlog.ai/register and sign in with Google, GitHub, or an email and password. This account becomes the owner of the organization. For continuity, use a work account that your organization can retain rather than a personal account or an alias only one person can access.
Signing in comes first, then the organization form appears on the same page. FeedLog does not create the organization until you submit this form, so you can close the page and return later.
Name it and pick a subdomain
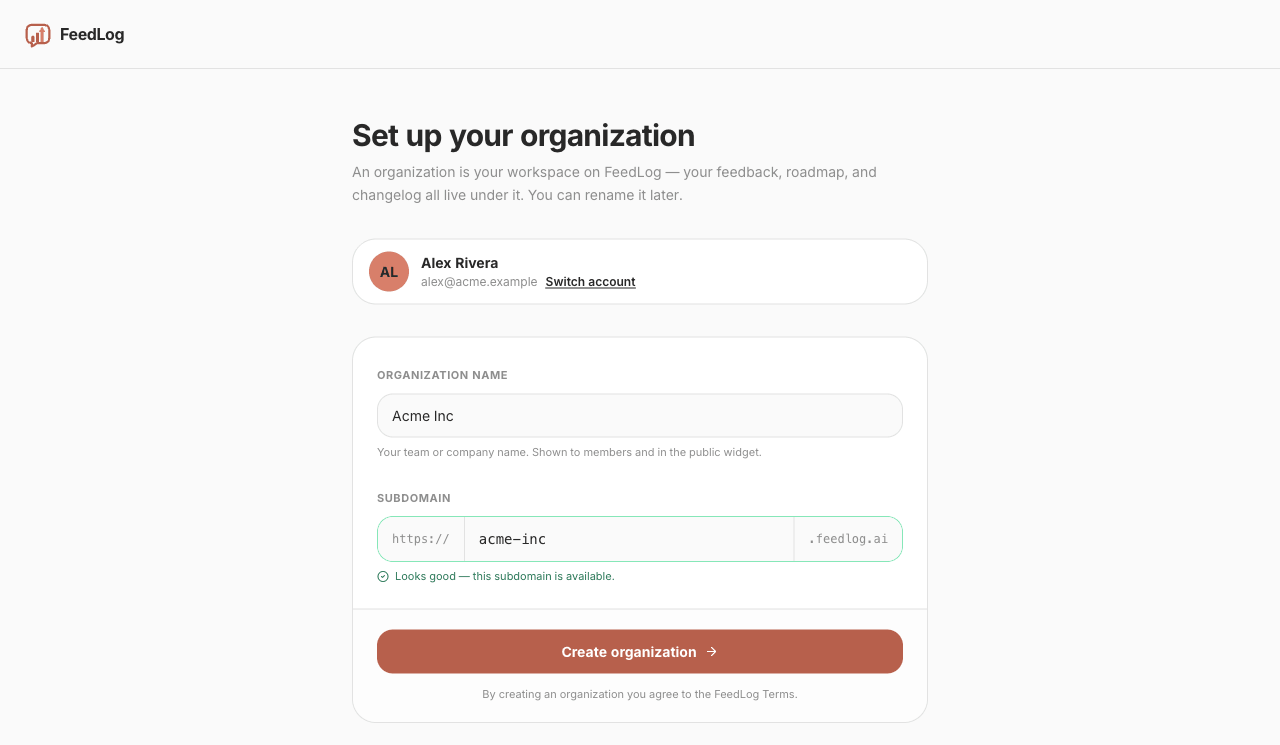
The form has two fields. You can change the organization name later. Choose the subdomain carefully because changing it affects existing links.
Organization name is your team or company name — Acme Inc, not Acme Feedback. It appears in the portal header, in invitation emails ("You're invited to join Acme Inc on FeedLog") and in the widget. Change it whenever you need to; changing the name does not change the portal address or existing content.
Subdomain determines the portal address, such as https://acme-inc.feedlog.ai. FeedLog suggests one from the name as you type. For example, Acme Inc becomes acme-inc. You can replace the suggestion. A subdomain must be three to 63 characters and contain only lowercase letters, digits and hyphens, with no hyphen at either end.
FeedLog checks availability as you type and turns the field green when the subdomain is available. It shows the same unavailable message whether a value is taken, reserved or malformed. Reserved names include infrastructure words (api, mail, www), FeedLog product terms (board, roadmap, changelog, widget) and any value containing feedlog, support, admin or billing. For example, acme-support is refused. Choose another value if the one you entered is not available.
Choose the subdomain carefully
You can change it later under Settings → Organization, and FeedLog will preserve your signed-in session at the new address. But the old one stops working immediately: it returns 404 with no redirect. Links, bookmarks and entry points in your product that use the old address must be updated.
If you need an address under a domain you control, point your own domain at the portal instead.
What you get
After you create the organization, FeedLog opens the dashboard with the following starter content:
- Four boards — Feature Requests, Bug Report, Improvements and Other.
- A welcome post on Other, authored by FeedLog Team. You can delete it after real feedback arrives.
- A changelog entry announcing that the workspace is live.
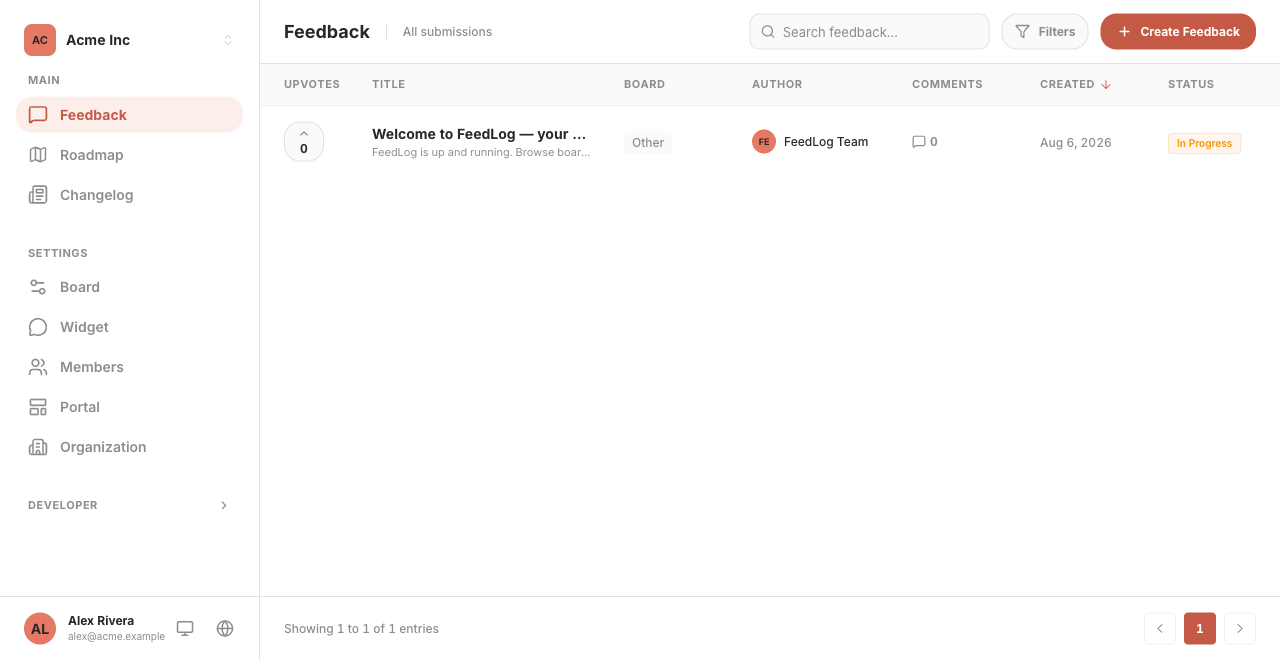
The sidebar has two sections. Main contains Feedback, Roadmap and Changelog for managing user submissions. Settings contains Board, Widget, Members, Portal and Organization for managing the workspace configuration.
Look at your portal before you share it
Open https://your-subdomain.feedlog.ai to view the public portal. It shows boards on the left, posts in the middle and a button for submitting new feedback.
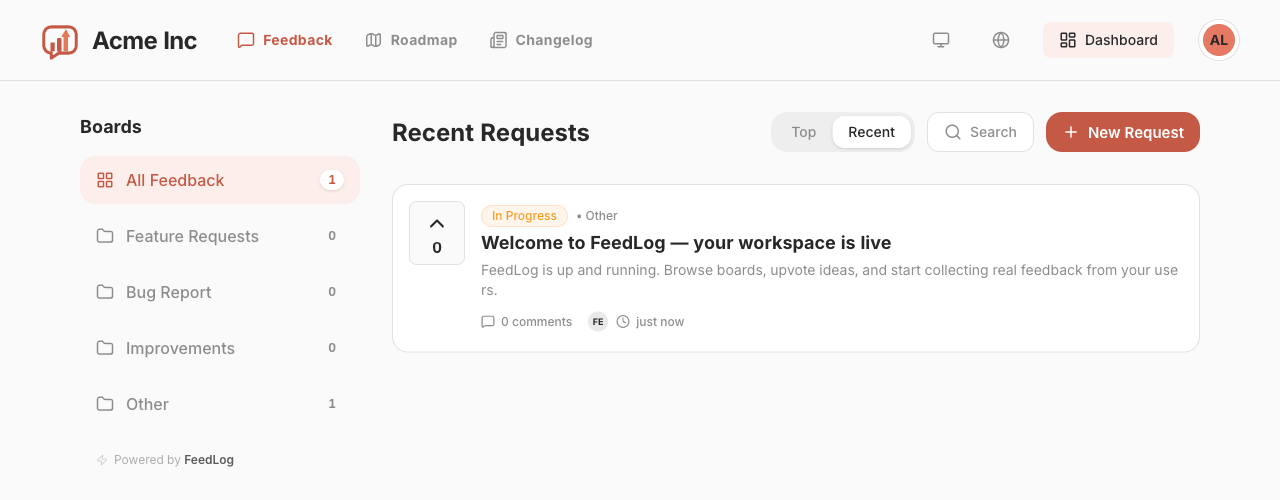
Review these items before sharing the portal:
- Check that the four boards fit your product. Each default board already has a name and description. If you add a board, describe the feedback it should contain because the AI uses that description to classify feedback from the widget. See Creating and managing boards.
- Write the welcome message at the top of the portal. Say what you want and what happens next; the default is a general-purpose template. See Workspace settings.
- Upload your logo and set your brand colour to match the portal to your product. These options are on the same page as the welcome message.
Put the entrance on your site
Add at least one visible entry point to the portal so users can find it:
A footer link, in the same row as About and Privacy. This is a simple, low-maintenance option:
<a href="https://acme-inc.feedlog.ai" target="_blank" rel="noopener">Feedback</a>A link in your product's help or settings menu. This makes the portal available while users are working in your product.
The feedback widget. A launcher inside your product that opens a panel in place. Users can submit a message without leaving the current page, and the AI can classify it and create feedback on the appropriate board. See The feedback widget for how it works and Install the feedback widget for installation instructions.
When adding an entry point, consider these two details:
Use a label such as "Feedback" or "Feature requests". Use "Support" only if the destination is monitored for support requests. Billing and account-access issues may contain information that should not be submitted to a public board.
Open it in a new tab. This keeps the user's current task open in your product.
If you want a single board rather than the whole portal — a Report a bug entry that goes straight to Bug Report — add ?b= to the URL. Linking to a single board covers the format and why you should link by ID rather than by name.
Invite the rest of the team
Settings → Members sends invitations by email. Owner has full access, Manager manages feedback, changelogs and the roadmap, and Contributor can view feedback in the dashboard and join discussions. Team members and invitations has the full role breakdown.
You can start collecting feedback without inviting anyone else. Assign someone to monitor the boards and respond to new feedback so users know it is being reviewed.
Where to go next
- How feedback works — voting, statuses, comments, and which emails go out when.
- Roadmap and changelog — publishing product progress based on the feedback you collect.
- The feedback widget — the in-product channel.
Creating and managing boards
A board is a container for feedback. Every post belongs to one board or remains uncategorized. Board names and descriptions help users decide where to submit their feedback.
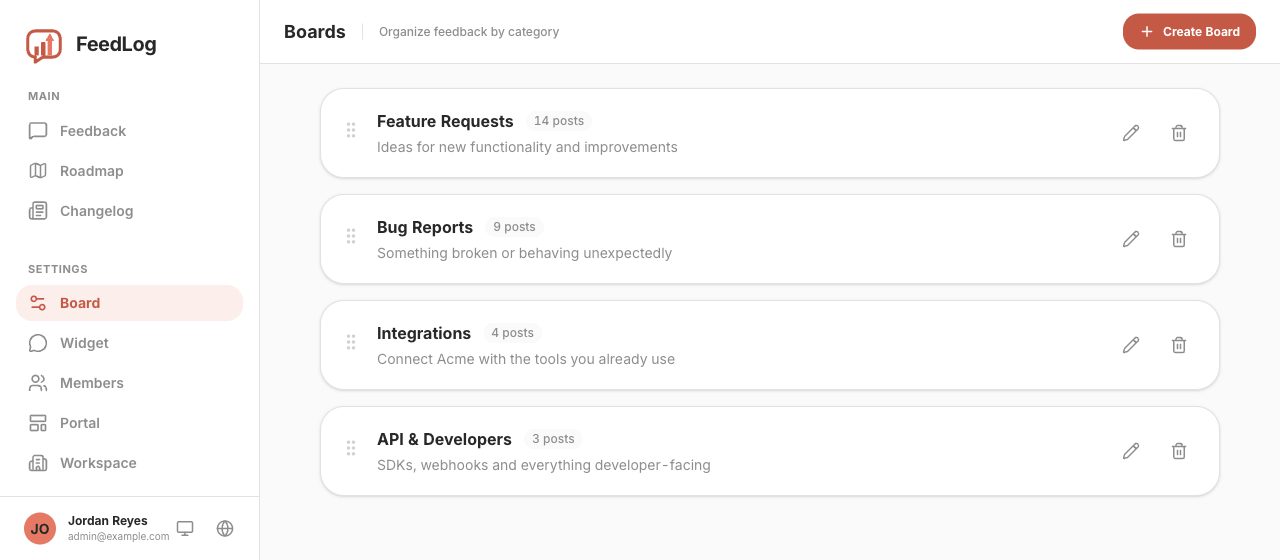
You manage them under Settings → Board in the dashboard.
Default boards
A new workspace includes four boards on both Cloud and self-hosted installations. You can start collecting feedback without creating or renaming any boards.
| Board | What goes in it |
|---|---|
| Feature Requests | Something the product doesn't do yet |
| Bug Report | Something that's broken |
| Improvements | A small change to something that already works |
| Other | Anything that fits none of the above |
We recommend keeping Feature Requests separate from Improvements. Use Feature Requests for capabilities the product does not yet provide, and Improvements for changes to existing capabilities. This distinction can make planning and prioritization easier.
Before adding more boards, check whether the four broad defaults are sufficient. Consider adding a board when a recurring category has enough feedback to benefit from its own view, and base the category on feedback you have actually received.
Deleting a board later leaves its posts uncategorized, and FeedLog does not offer bulk reassignment. You must assign those posts to another board one at a time.
Creating a board
Click Create Board and give it a name and an optional description.
The name is capped at 100 characters and is the only required field. The description appears under the name on the portal and can explain what belongs in the board. For example, "Something broken or behaving unexpectedly" defines the scope more clearly than "Bugs".
Board names are not required to be unique. Two boards can share a name, and FeedLog does not display a warning. We recommend using unique names because name-based board links can otherwise select the wrong board, as explained below.
Ordering boards
Drag the handle on the left of any row. The order you set is the order your users see on the portal, and it saves as soon as you drop.
Consider placing the board you expect people to use most often first.
Editing a board
The pencil icon opens the same form as Create Board. You can change the name and the description at any time, and the posts in the board stay where they are.
Renaming can stop shared links from filtering
Board links can be built from the board's name (see below). If you share one and later rename the board, the link no longer filters by that board. FeedLog does not display an error and instead shows all feedback.
Deleting a board
Click the trash icon, then confirm the deletion.
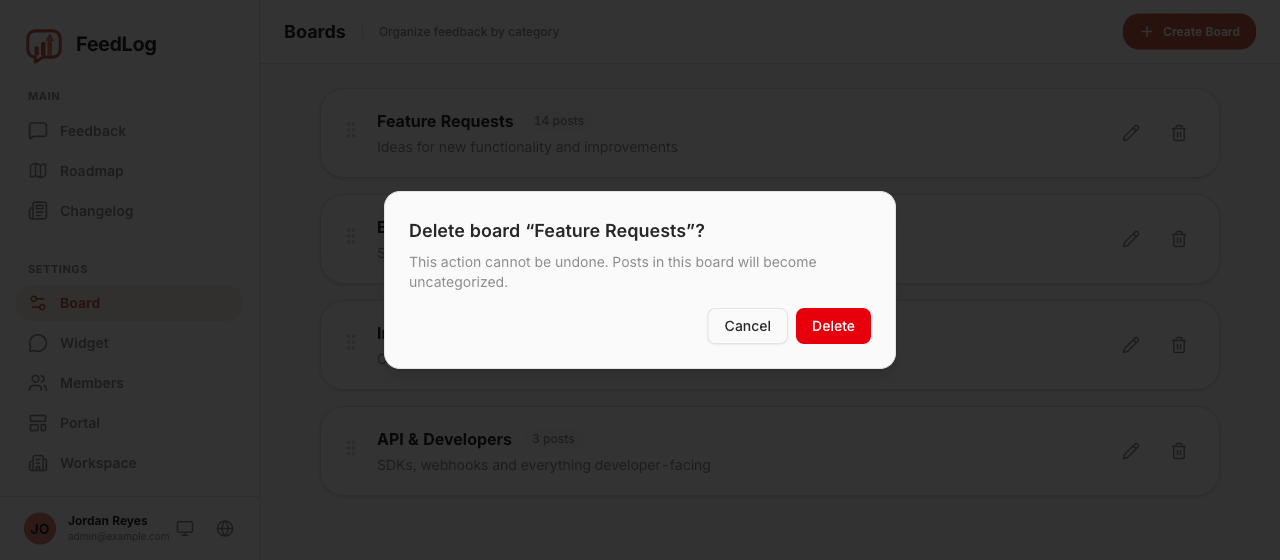
Deleting a board does not delete the feedback in it. The posts retain their votes, comments, and status but become uncategorized. They no longer appear in views filtered by board, but remain under All Feedback on the portal and in the dashboard's feedback list.
If you want to remove the feedback, you must delete the posts themselves.
To categorize a post again, open it and select a board from the post page. There is no bulk reassignment, so consider renaming a board with many posts instead of deleting it.
Linking to a single board
Add ?b= to your portal URL to open it with one board already selected:
https://feedback.yourdomain.com/?b=Bug%20ReportsThe value can be the board's name (case-insensitive) or its ID. Names are readable and suitable for short-lived links, such as a link shared in Slack. IDs are stable and recommended for long-lived links, such as an entry in your product's help menu or a bookmark used by your support team.
If the value does not match a board, FeedLog ignores it and shows all feedback instead of displaying an error. If two boards share a name, a name-based link selects whichever board appears first. Reordering the boards can therefore change which board the link selects.
How feedback works
This page covers the complete feedback workflow: who can submit feedback, the three submission methods, attachments, voting, comments, statuses, and the notifications sent by each action.
Who can post
Anyone can read the portal without signing in. A signed-out visitor can see every board and post, along with comments, vote counts, the roadmap, and the changelog.
Every action needs an account: posting, voting, commenting, liking a comment. Clicking one of those actions while signed out opens the sign-in dialog. The available methods depend on the workspace configuration: email and password, Google, GitHub, or automatic sign-in from your product through single sign-on.
How feedback arrives
From the portal
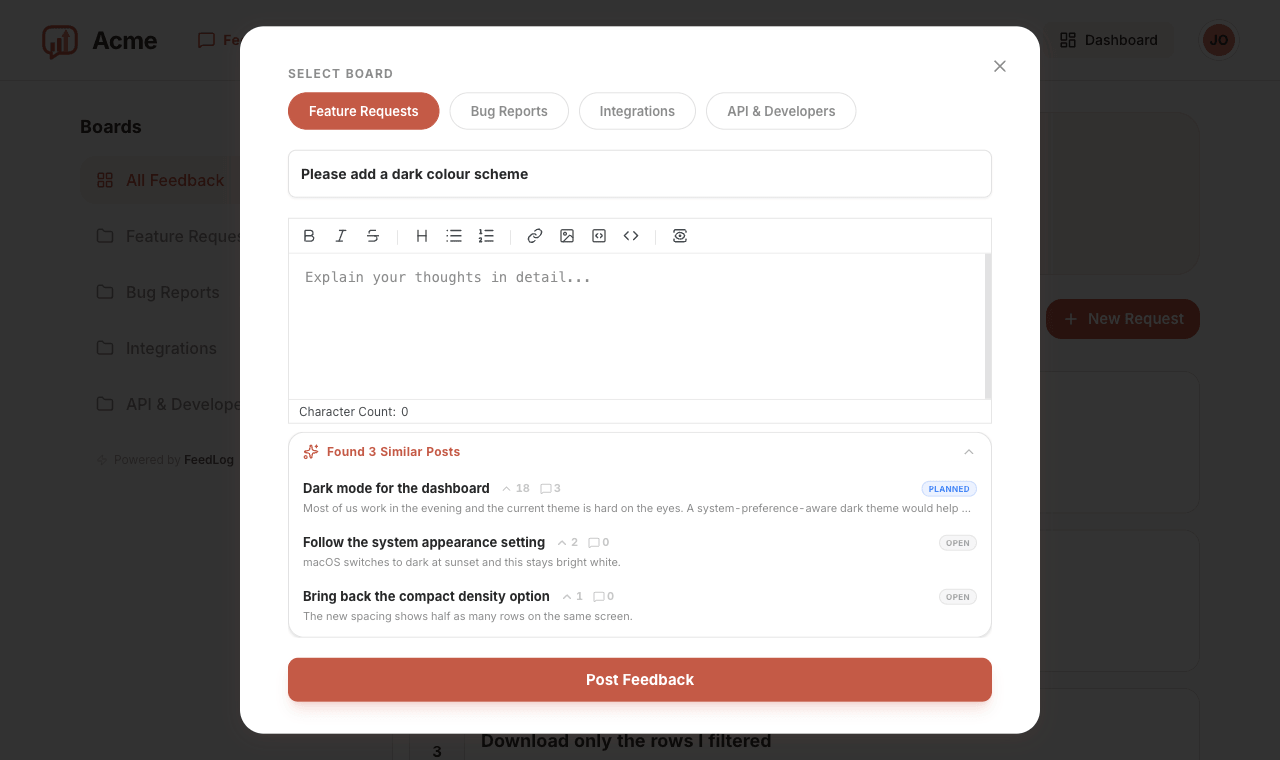
New post opens a form: pick a board, write a title (up to 200 characters) and a description in Markdown (up to 10,000). The board is required; this form cannot submit an uncategorized post.
Starting with the third character of the title, FeedLog looks for existing posts about the same subject and lists them below the editor. This lets the author find a possible duplicate before submitting a new post. For duplicates that have already been submitted, see Finding and merging duplicates.
You can also link straight into a form that is already filled in:
https://feedback.yourdomain.com/?new=1&title=Dark%20mode&body=It%20burnsThis is the only entry point that lets signed-out visitors open a draft before signing in. The sign-in prompt appears when they submit, and the draft remains available after sign-in. Values over the limits are truncated rather than rejected. FeedLog also removes the parameters from the address bar after opening the form, so refreshing the page does not load the draft again and copying the current URL does not include its contents.
From the widget
The widget is a panel embedded in your product. Users describe the problem in their own words, and AI either turns the message into a structured post with a title, description, and board, or directs the user to your support channel. A post created by the widget supports the same voting, comments, and notifications as one submitted through the portal. For its decision rules and settings, see The feedback widget. For installation instructions, see Install the feedback widget.
Filed by an admin
Staff can record feedback received by email, during a call, or in a support thread. The Feedback and Roadmap pages in the dashboard use the same submission form, and the staff member's account becomes the post author.
Owners and managers are not subscribed to posts, including posts they create. Recording feedback with a staff account also does not subscribe the original customer. To receive later notifications, the customer must submit, upvote, or subscribe to the post with their own account.
Attachments
Attachments support images only, up to 10 MB each. Other file types, including log files, PDFs, and videos, are not supported.
You can add an image with the image button in the editor toolbar or paste one from the clipboard. Dragging a file onto the editor does nothing. Descriptions and comments both accept images, and both methods require you to be signed in.
Uploads use the workspace's storage prefix and are served through FeedLog rather than directly from a bucket URL, so the bucket does not need to be public. Self-hosted instances select a storage backend as described in Configuring external services. Without one, Docker uses local disk, while uploads fail on Vercel and Cloudflare Workers.
If an upload fails, no error message appears and the image is not inserted. Try uploading the image again.
Voting
Each person can cast one vote on a post. Clicking the vote button again removes the vote. Repeated requests do not create duplicate votes.
The number on a post counts distinct voters. When two posts are merged, FeedLog does not simply add their totals; a person who voted on both is counted once. See Finding and merging duplicates for details.
Voting also subscribes you to the post. Removing your vote does not remove the subscription. To stop receiving notifications for the post, click Unsubscribe.
Owners and managers are the exception. Their votes count, but voting does not subscribe them because they do not receive feedback notification emails.
Merged posts no longer accept votes or comments. Both actions remain available on the post that was retained.
Comments
Comments support Markdown, images, and up to 5,000 characters. Each comment can receive likes.
Nesting stops at one level. You can reply to a top-level comment. Replying to a reply does not create a third level; the new comment is attached to the same top-level comment and includes an @mention of the person you answered. The server enforces this limit, so it also applies to requests made outside the user interface.
Only the author can edit a comment. Owners and managers can delete another person's comment, but they cannot edit it. Edited comments carry an (edited) marker.
Authors can delete their own comments, while owners and managers can delete any comment. Deleting a top-level comment also deletes its replies, as stated in the confirmation dialog.
Statuses
FeedLog has four statuses: Open, Planned, In Progress, and Completed. New feedback starts as Open.
Owners and managers change the status from the sidebar on the portal post page or in the dashboard's detail view. There is no bulk status change. Statuses can be applied in any order, including moving a post to an earlier status.
Planned, In Progress, and Completed posts appear on the public roadmap. Open posts do not. See Roadmap and changelog for details.
Changing a status does not send an email by itself. After the change, a prompt appears in the sidebar and asks whether to notify the people following the post. Dismissing the prompt keeps the status change without sending an email.
When sending the announcement, you can add a note of up to 2,000 characters to replace the default wording in the email body. If someone else changes the status while the prompt is open, FeedLog refuses to send the announcement so it does not describe an outdated status.
Notification emails
Feedback actions can send two types of notification email:
| Owners and managers | Everyone else | Sent when | |
|---|---|---|---|
| Status changed | Never | People following the post | An admin changes the status and then chooses to announce it |
| Official reply | Never | People following the post | An owner or manager writes a top-level comment |
There is no "new feedback" or general "new comment" email. Submitting a post, writing a comment as a regular user, or replying to a comment does not send an email. Only a top-level comment from an owner or manager counts as an official reply.
FeedLog's other emails, including verification, password reset, and workspace invitations, belong to accounts rather than feedback. They are listed in Configuring external services.
Who is following a post
A person follows a post after writing it, upvoting it, or clicking Subscribe. Users cannot subscribe another person.
Every send excludes owners and managers, as well as the person who caused the event. Owners and managers do not see the Subscribe button and cannot follow a post through another action.
Subscriptions are preserved during a merge. If a post you follow is merged into another one, you continue to receive notifications about the retained post.
For official replies, the comment box shows admins a Notify upvoters toggle. Turning it off still emails the post author and anyone who clicked Subscribe, but excludes people who follow the post only because they voted. Status announcements do not have this option and are sent to everyone following the post.
Unsubscribing
The Unsubscribe button appears on the post in the same place as Subscribe. It applies only to that post.
There is no account-wide setting, and the emails do not include an unsubscribe link. They only explain why the recipient received the message. To stop all feedback notifications, unsubscribe from each post separately.
On a self-hosted instance without a configured mail provider, notification emails are not sent and no error is thrown. Instead, each message is written to the log with a [DEV EMAIL] prefix. See Configuring external services for setup instructions.
The feedback widget
The widget adds a feedback channel inside your product. Users open the panel in the corner and describe a problem or idea without visiting a separate site, choosing a board or writing a title first.
The AI classifies each message into one of three outcomes described below. This page covers the user experience and available settings. For integration steps, see Install the feedback widget.
The launcher
The launcher is a 56-pixel round button in the bottom-right corner, displayed above the rest of the page.
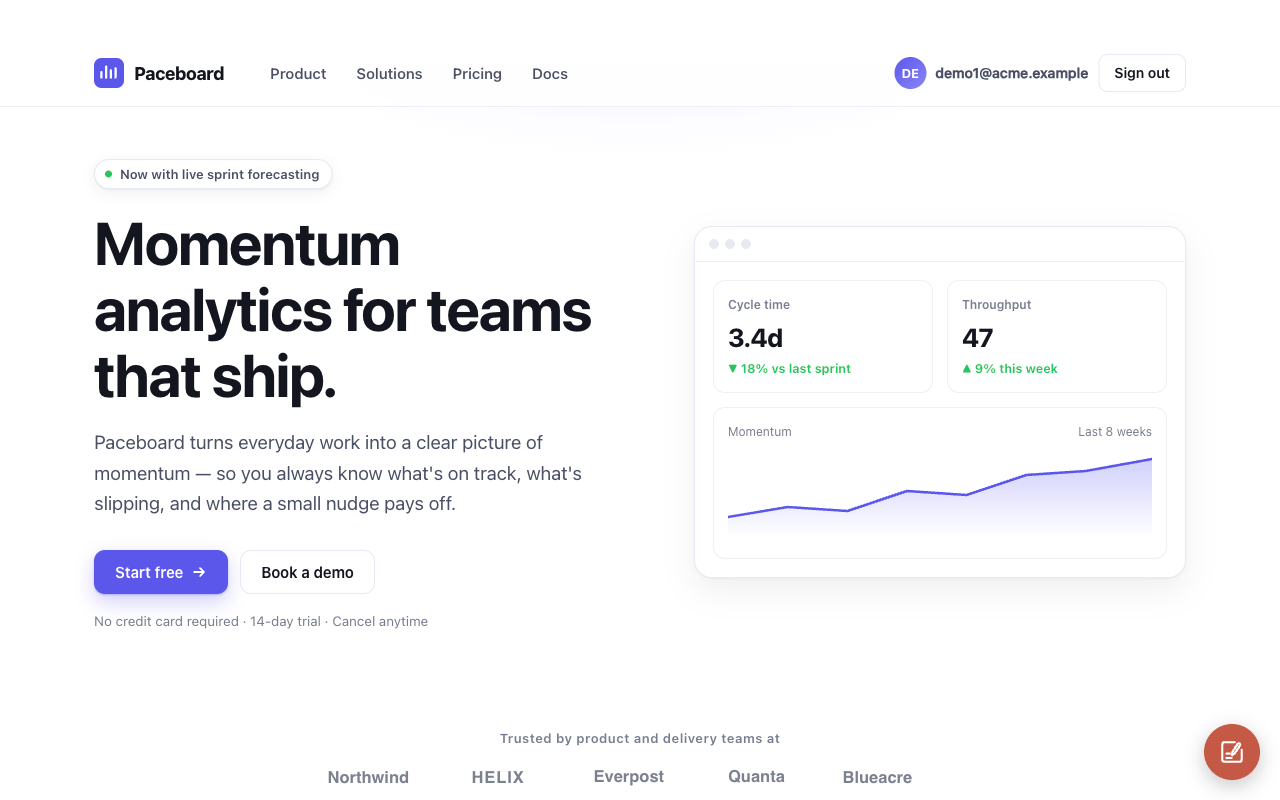
Its colour is your FeedLog brand colour, configured under Settings → Workspace. It does not inherit colours from the host page. In the example above, the host site is indigo and the workspace brand colour is terracotta. To make them match, change the brand colour in FeedLog. There is no per-site override, and the same colour is used on your portal.
The icon and position are fixed and cannot be configured.
The panel
Clicking the launcher opens a 400-pixel panel above it. At screen widths below 520 pixels, the panel opens full-screen instead.
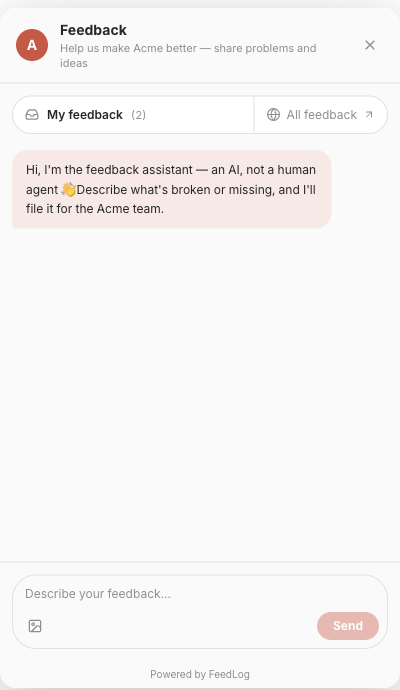
Everything inside it is served by FeedLog in a cross-origin iframe. Your site's CSS cannot affect the panel, and the panel cannot read content from the host page. FeedLog can also update the panel without requiring a new release of your product.
Reading down the panel:
- The header carries your workspace logo, or the first letter of your workspace name when you haven't uploaded one, then the fixed title Feedback and a line naming your workspace: Help us make Acme better — share problems and ideas. A workspace with no name set reads this product instead. Set the workspace name before installing the widget if you want it shown here.
- Two tabs. My feedback switches to the user's own posts, with the count beside it. All feedback opens your portal in a new tab.
- The assistant's opening line identifies it as an AI rather than a human support agent. It does not have access to support systems such as order records.
- The composer accepts text and images, up to 10 MB per image, pasted or selected from a file dialog. Images are attached to the post that gets created, but the AI does not inspect them. A screenshot without a text description cannot be classified.
Each message is evaluated independently. The panel uses a chat layout but does not use earlier messages as context: "it's broken" and "I mean the export button" receive two separate results. The original messages are not stored. If a message becomes feedback, only the resulting post is stored.
The three outcomes
Every message ends as exactly one of three:
| Outcome | The user gets | You get |
|---|---|---|
| Feedback | A confirmation and a card: title, board, status | A post on a board, under their name |
| Support | An apology and your support email | Nothing |
| Unrecognized | A nudge to describe the problem | Nothing |
The AI evaluates the outcomes in this order: support, feedback, then unrecognized. Checking support first keeps account-specific requests such as "I was double charged" off the public feedback board when a matching handoff rule is enabled.
Feedback
The AI writes a one-line title and restates the message as the body in the first person, using the user's own words without adding details. It then selects the best-matching board from the board names and descriptions. Clear descriptions improve this classification (Creating and managing boards). If no board matches, the post goes to your first board. If there are no boards, it is left uncategorized.
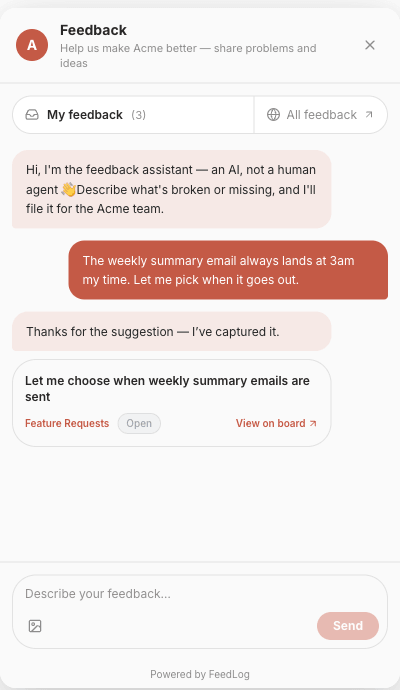
The confirmation card shows the generated title, selected board, status and a link to the post on your portal. The title may differ from the original message because the AI rewrites the request for use in a feedback list.
When the confirmation appears, the post is already published on the portal and available for votes and comments. It also appears in your dashboard with the user as its author. The user is subscribed automatically and receives your replies and status changes.
Support
The assistant says the message requires human support and provides your support email. No feedback or support ticket is created. This keeps account-specific requests, such as refunds, off the public feedback board.
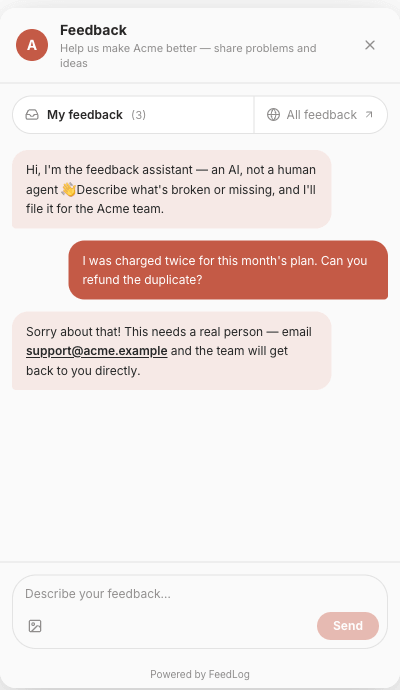
The address is a mailto link, so the user can open a new email without copying the address. The handoff rules below determine which messages receive this result.
Unrecognized
The message is unclear, off-topic or does not describe a product problem. The assistant asks the user to describe what is not working. No feedback is created, and the user can submit another message immediately.
Signed-out users
The widget does not have a separate login. It gets the current user's identity from the getToken function configured during installation.
When getToken returns null, the conversation and composer are replaced by Sign in to send feedback and a button that calls back into your sign-in flow, whether that is a modal, page or identity provider. Users do not need a separate FeedLog account. After they sign in to your product, the panel updates to the signed-in state.
Widget posts use the name and email supplied by your product instead of an Anonymous author. Install the feedback widget explains the integration, and Single sign-on explains the token.
Turning it on
Settings → Widget, then the Enable widget switch on the Installation card. Off means the SDK renders nothing on your site — no launcher, no badge, not even a console warning. This setting applies to every site where the widget is installed and does not require a new deployment of your product.
The widget is on by default, including for a workspace that has never saved this page. Only owners and managers can change these settings. Other members see a notice that they do not have permission.
The support email
Support email, under Contact support, is the address every handoff points at.
Leaving it empty does not disable handoffs. The assistant still asks the user to contact support but cannot provide an address. Configure this field before enabling handoff rules.
Handoff rules
A rule completes the sentence Redirect to support when…. Each enabled rule is added verbatim to the assistant's instructions. FeedLog includes three built-in rules:
| Built-in rule | Redirects when the user |
|---|---|
| Billing | needs help with a charge, refund, payment failure or invoice on their account |
| Account access | is blocked by a login problem, an account lockout, or unauthorized access |
| Privacy and legal | is making a privacy, data-deletion, copyright or other legal request about their own data |
Built-in rules can be switched off individually but cannot be edited or deleted. Custom rules can be edited or deleted and can contain up to 180 characters. At most 10 rules can be enabled at once, including built-in and custom rules.
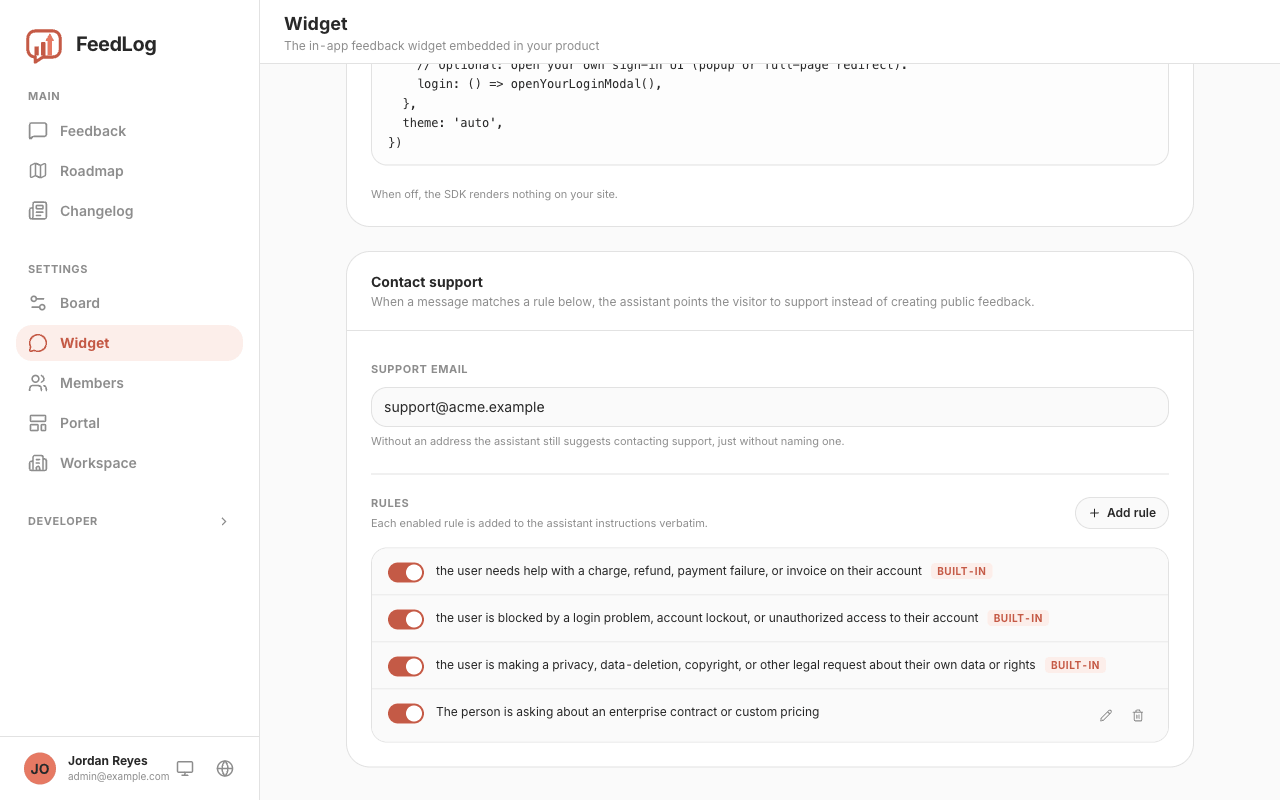
Describe a situation rather than a broad topic. "user asks about enterprise contracts or custom pricing" is a rule; "billing" is not. The AI evaluates intent: a request for help with the user's account, data or payment can go to support, while a product suggestion remains feedback even if it uses similar terms. For example, "Add a privacy policy page" is feedback, while "Delete my account" is support.
No rules enabled means no handoffs, ever
Switching off all three built-ins and adding none of your own does not fall back to the AI's default judgement. It removes support from the available outcomes. Every message then resolves as feedback or unrecognized, so a refund request may become a public post under the user's name if it is classified as feedback.
The settings page does not warn when all rules are disabled. Disabling all handoffs is a supported configuration. If you want account-specific requests directed to a support team, leave the relevant built-in rules enabled.
My feedback and unread updates
The My feedback tab lists the user's own posts, newest first. Each item shows its status, vote count and age, with a link that opens it on your portal. If the user has not posted yet, the panel shows a full-width All feedback link to the other feedback on your portal.
When you reply to a post or change its status, a red badge appears on the author's launcher. Unread badges are always red and do not use the workspace brand colour. Inside the panel, the tab reads 3 posts · 1 with updates and the updated post carries a red dot. Opening that post clears the launcher badge, tab count and post dot.
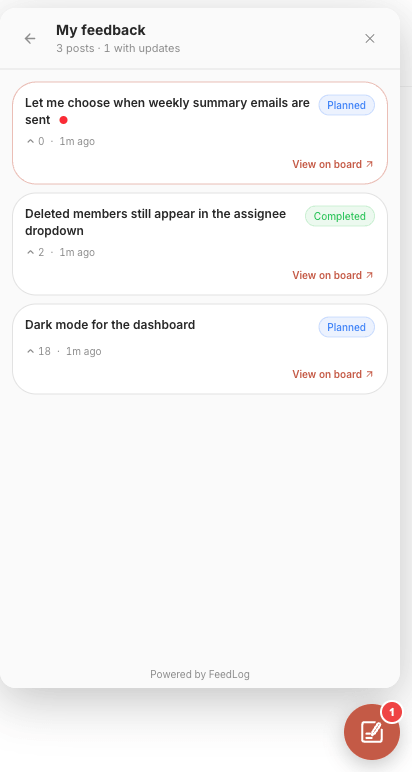
Only authors receive these indicators, and only for their own posts. The badge count is capped at 9+.
Common errors
Nothing appears in your product. Enable widget may be off, or the SDK may not have initialized. Check the setting first, then verify the installation by following Install the feedback widget.
Every message returns "Could not send that. Please try again." On a self-hosted instance, the usual causes are a missing OPENAI_API_KEY or an unreachable AI provider. The widget still renders, sign-in works and My feedback loads, but messages cannot be processed without the AI service. Check the provider configuration in Configuring external services.
The panel says "Sign in to send feedback" to someone who is signed in.getToken is returning null, or FeedLog is rejecting the token. Common causes include an expired token and a token signed with the wrong secret. Verify the three return states and signing configuration in Install the feedback widget.
The launcher uses an unexpected colour. It uses the FeedLog workspace brand colour rather than colours from your site. Change it under Settings → Workspace; there is no per-site override.
Feedback keeps landing on the wrong board. When no board matches, the AI uses the first board as a fallback. Review the board names and descriptions, which are the fields used for classification.
Everything gets sent to support. One or more rules may describe a broad topic instead of a specific situation. Replace "anything about billing" with a narrower rule such as "the user needs help with a charge on their account".
A message is rejected before the AI processes it. A message can contain at most 4,000 characters, and each network can send about 20 messages per minute. Shorten an oversized message or wait before retrying after the rate limit.
Finding and merging duplicates
Users may describe the same request in different ways. One person asks for dark mode, another for a night theme, and a third wants the app to follow their system appearance setting. Without duplicate detection, these requests remain separate posts with separate vote counts.
FeedLog can match these posts by meaning rather than by keyword. A manager or owner can then merge them into one thread without losing votes.
How similarity detection works
When feedback is created or edited, FeedLog sends its title and body to an embedding model and stores the returned 768-dimensional vector with the post. FeedLog compares these vectors to rank posts by semantic similarity, even when the posts do not share any words.
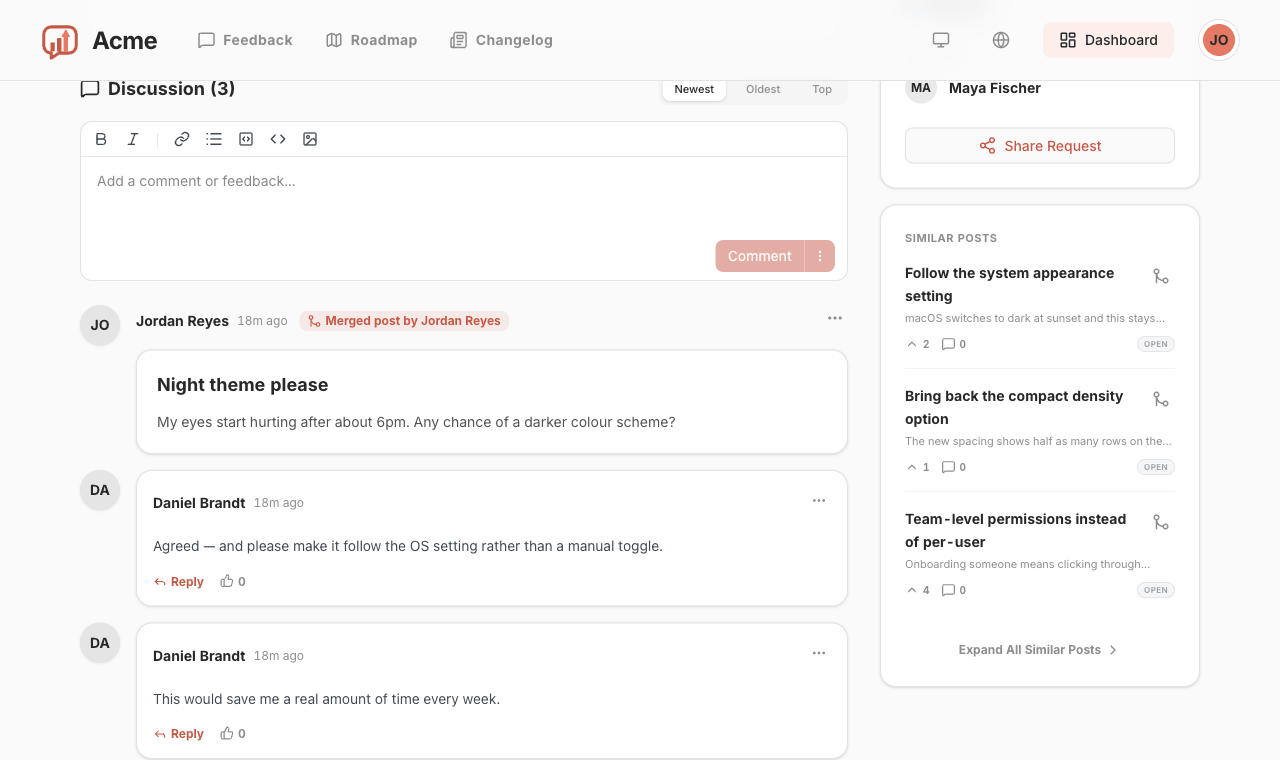
For example, "Night theme please" and "Dark mode for the dashboard" have no words in common. A keyword search for one would not find the other, but their vectors can still be close enough to rank them together.
Suggestions are rankings, not confirmation of a duplicate. FeedLog returns the closest posts without applying a similarity cutoff. Even when no close match exists, the list still contains the three nearest posts. A manager or owner must decide whether two posts describe the same request.
Semantic suggestions exclude posts without an embedding. FeedLog generates embeddings in the background after a post is saved, so a new post may take a short time to appear in semantic suggestions. Posts created without an AI key, and posts for which embedding generation failed, do not receive an embedding automatically later. They remain available through text search but require a backfill before semantic matching can include them. See Configuring external services for instructions.
Posts already merged into another post are excluded from every suggestion list.
Where suggestions appear
In the submission form
The submit form searches while the user types. Once the title reaches three characters, the Found 3 Similar Posts panel appears below the editor and refreshes shortly after typing stops. If the body already contains text, the panel appears collapsed so it does not cover the editor.
Selecting a suggestion opens the existing post. The user can then vote for that post instead of submitting another copy of the same request.
On the post page
Each post that has not been merged has a Similar Posts card in its sidebar. The card lists the three closest posts, and Expand All Similar Posts shows up to ten. Anyone can see the card, whether signed in or not.
Managers and owners also see a merge icon on each row, allowing them to start a merge directly from the sidebar.
Merging posts
Merging is limited to managers and owners. There are two entry points:
- The merge icon on a row of the Similar Posts card, which offers Merge into current and Merge current into this.
- The post's merge menu, with Merge to this post and Merge this post into…. The dialog initially lists the ten closest posts. Entering text in its search box replaces that list with three matches for the search text.
The merge direction determines which post remains active. Users can continue to vote and comment on that post. The other post displays a link to it.
Choosing the retained post
Prefer the post with the clearest title. It does not have to be the post that was submitted first.
After a merge, the merged post keeps its URL and remains accessible. A This post was merged into banner links to the retained post. The merged post no longer appears in the feedback list, search results, roadmap, or suggestion lists. Users cannot vote or comment on it, and it cannot be deleted until it is unmerged.
The retained post gains a card in its comment timeline for the merged post. The merged post's comments can be loaded from this card. The comments are not copied; they remain attached to the post on which they were written.
Followers of the merged post continue to receive status updates from the retained post. This preserves notifications for the person who submitted the duplicate.
You can merge a post that already contains merged posts; the complete group moves with it. You cannot merge into a post that has itself been merged. FeedLog rejects the operation to prevent a chain of redirects.
How votes are combined
The retained post's vote count becomes the number of distinct people who voted on any post in the merged group. FeedLog does not simply add the two vote counts.
If a post with 17 votes absorbs one with 4, and two people voted on both, the retained post has 19 votes. This applies the same one-person, one-vote rule used elsewhere in FeedLog. Anyone who voted on the merged post also counts as having voted on the retained post and cannot add another vote.
The merged post retains its original vote count. Its votes remain attached to it and are counted separately again if the posts are unmerged.
Unmerging
Open the retained post, find the merged card in its comment timeline, and select Unmerge from its menu.
The merged post becomes a regular post again. It reappears in the feedback list, search results, and roadmap, and users can vote and comment on it. Both vote counts are recalculated immediately. The retained post no longer counts people who voted only on the former duplicate, but it continues to count people who voted on both posts.
Votes and comments remain attached to their original posts throughout the merge, so unmerging does not need to restore or copy them.
After unmerging, the merge card is removed from the timeline and no merge record remains there. Votes cast on the retained post while the merge was active remain on that post.
Without an AI key configured
Degraded, not disabled
On a self-hosted instance without OPENAI_API_KEY, the panels, dialogs, and merge operations described on this page remain available. Only the similarity method changes: FeedLog falls back to trigram text distance over the title and body, comparing character sequences instead of meaning.
Typos and nearly identical phrases can still match. Different wording may not: "Night theme please" and "Dark mode for the dashboard" no longer match each other. The interface does not indicate when text matching misses a semantically similar post.
Adding the key later generates embeddings only for new or subsequently edited posts. Older feedback must be backfilled.
Roadmap and changelog
The roadmap shows which feedback is planned, in progress, or completed. The changelog records changes that have shipped. Both are public pages in the portal's top navigation, next to Feedback, so visitors can follow a request by checking feedback statuses and published changes.
The public roadmap
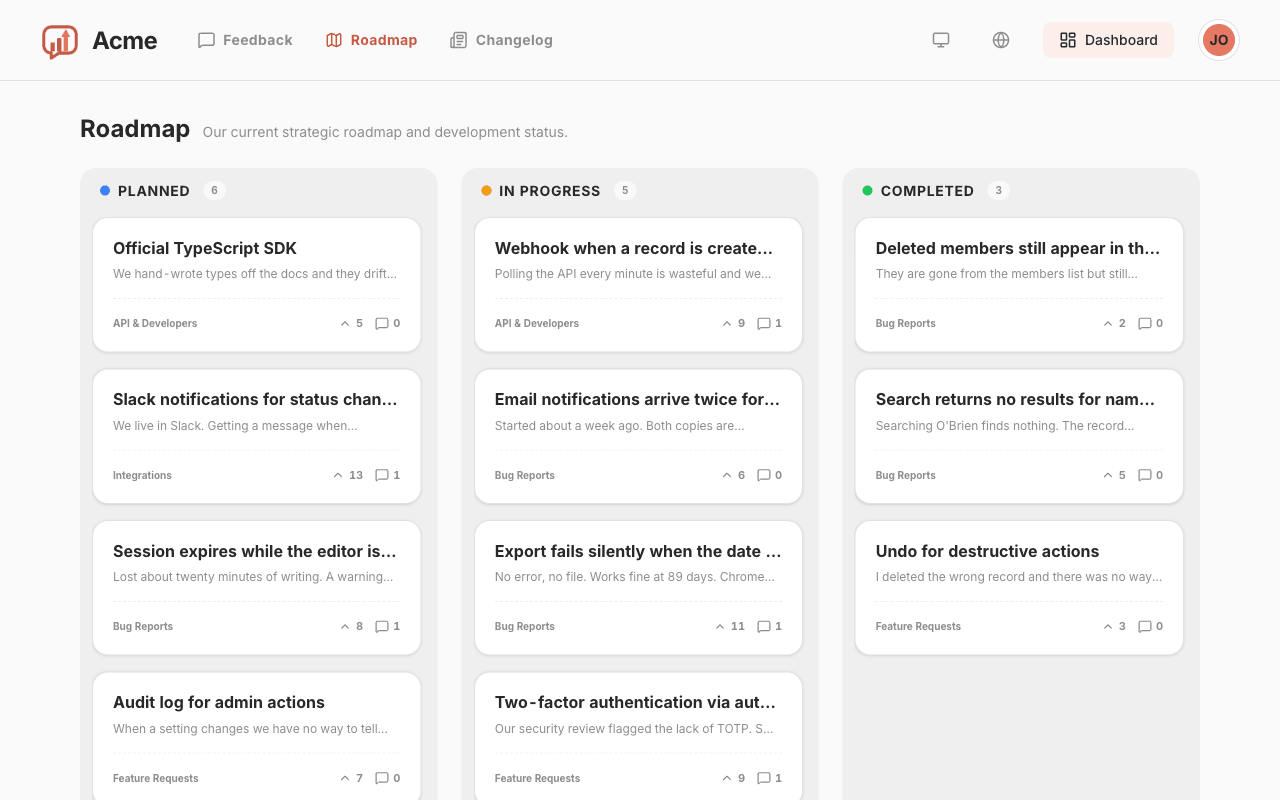
The roadmap at /roadmap displays feedback in three columns: Planned, In Progress, and Completed. Each card shows the title, a one-line excerpt, the board the post belongs to, and its vote and comment counts.
Which statuses appear
Feedback has four statuses, but the roadmap shows only Planned, In Progress, and Completed. New feedback starts as Open and does not appear on the roadmap.
Changing an Open post to one of the three roadmap statuses adds it to the public roadmap immediately. Changing it back to Open removes it from the roadmap without deleting the post.
Merged duplicates are not listed separately; only the post they were merged into appears. Each column initially loads its ten most recent posts, ordered by submission date rather than vote count. The header badge shows the column's total number of posts, and Load more retrieves the next page.
What visitors can do
Each card opens the feedback detail page, including the full description, comments, and vote button. Anyone can read the page, but voting and commenting require an account.
Voting and commenting remain available in every status, including Completed. Changing a post's roadmap status does not close either action.
Moving cards
Dashboard → Roadmap adds administrative controls to the same three-column view: drag and drop between columns, filtering by board, and a + button in each column header that creates a post in that status.
Moving a card by dragging it does not send email. To notify upvoters about a status change, open the feedback detail page, change the status there, and use the notification option. See How feedback works for the notification rules.
The changelog
The changelog at /changelog lists published entries in reverse chronological order. The first two entries are expanded and the rest are collapsed. Each entry also has a page at /changelog/<slug> that you can link to directly.
An entry has a title of up to 70 characters, a Markdown body, up to three category badges, and an optional cover image (1200 × 480 works best). You create entries under Dashboard → Changelog.
Draft, published, needs update
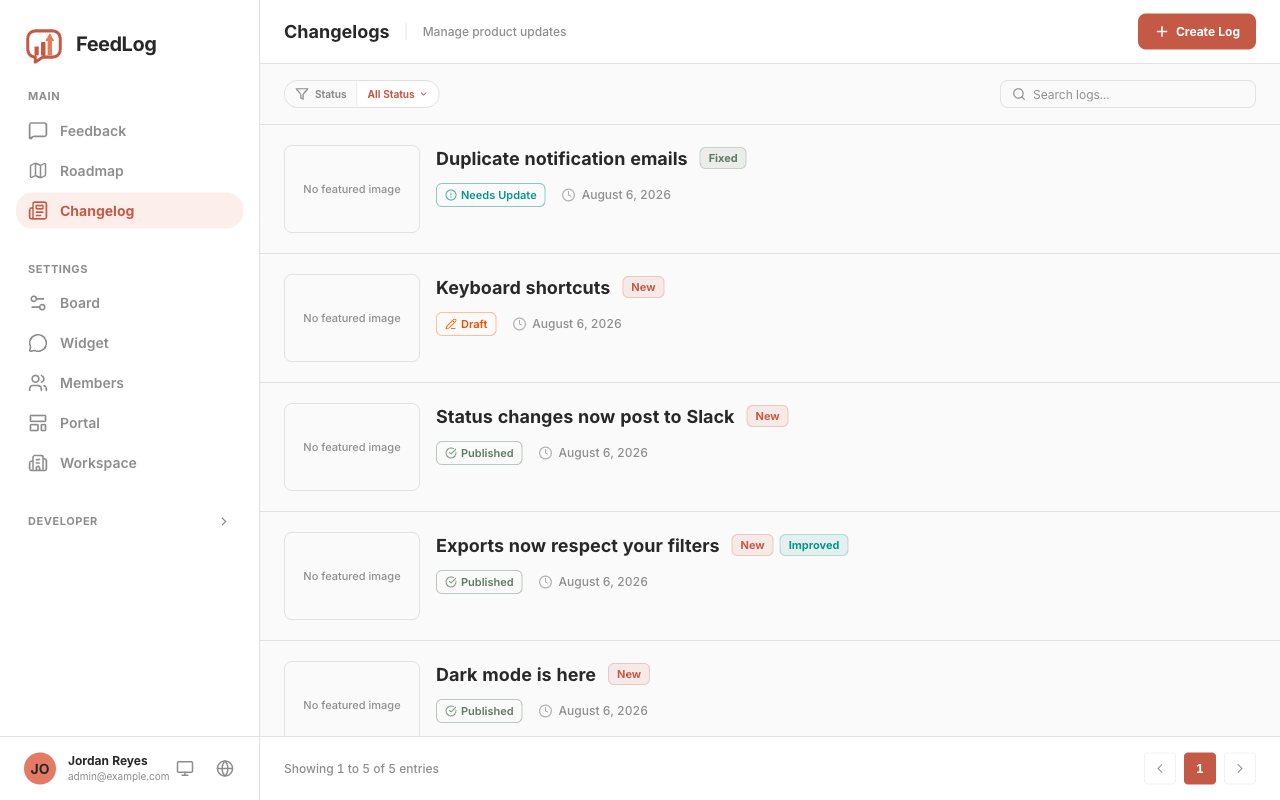
Each entry has an editable version and a published version. Selecting Publish copies the editable version to the published version. The status describes the relationship between these two versions.
Draft — the entry has never been published, so it is not available on the public changelog and does not have a public page.
Published — the editable and published versions match.
Needs update — changes have been saved after the last publication. Saving does not update the public page; the previously published version remains live until you select Publish again. Any saved change, including a title correction, moves a Published entry to Needs update.
Use the status filter above the changelog list to find all entries whose published version differs from the editable version.
Republishing moves the entry to today
Every publication sets the entry's publication time to the current time. Republishing an older entry therefore gives it today's date and moves it to the top of the timeline. Consider this effect before republishing a minor correction.
The URL is created when the entry is first saved, using the title and a short random suffix. Renaming the entry later does not change its URL. Deleting an entry also deletes its reactions.
New, Improved, Fixed
An entry can use any combination of the three categories, which appear as badges on the timeline:
- Use New for a capability that did not exist before.
- Use Improved for a change to an existing capability.
- Use Fixed for a bug fix.
If an entry covers more than one type of change, apply each relevant category.
Reactions
Signed-in readers can react to a published entry with six emoji: 👍 ❤️ 🎉 ✨ 👀 🤔. One person can add several different reactions to the same entry. Selecting an existing reaction again removes it. Signed-out readers are prompted to sign in. Only reactions with at least one response are displayed, so a new entry shows the add button instead of six zero counts.
Interpreting reactions
Reaction counts are a general engagement signal. An emoji alone does not explain why someone selected it, so use comments and feedback when you need more detail.
Drafting with AI
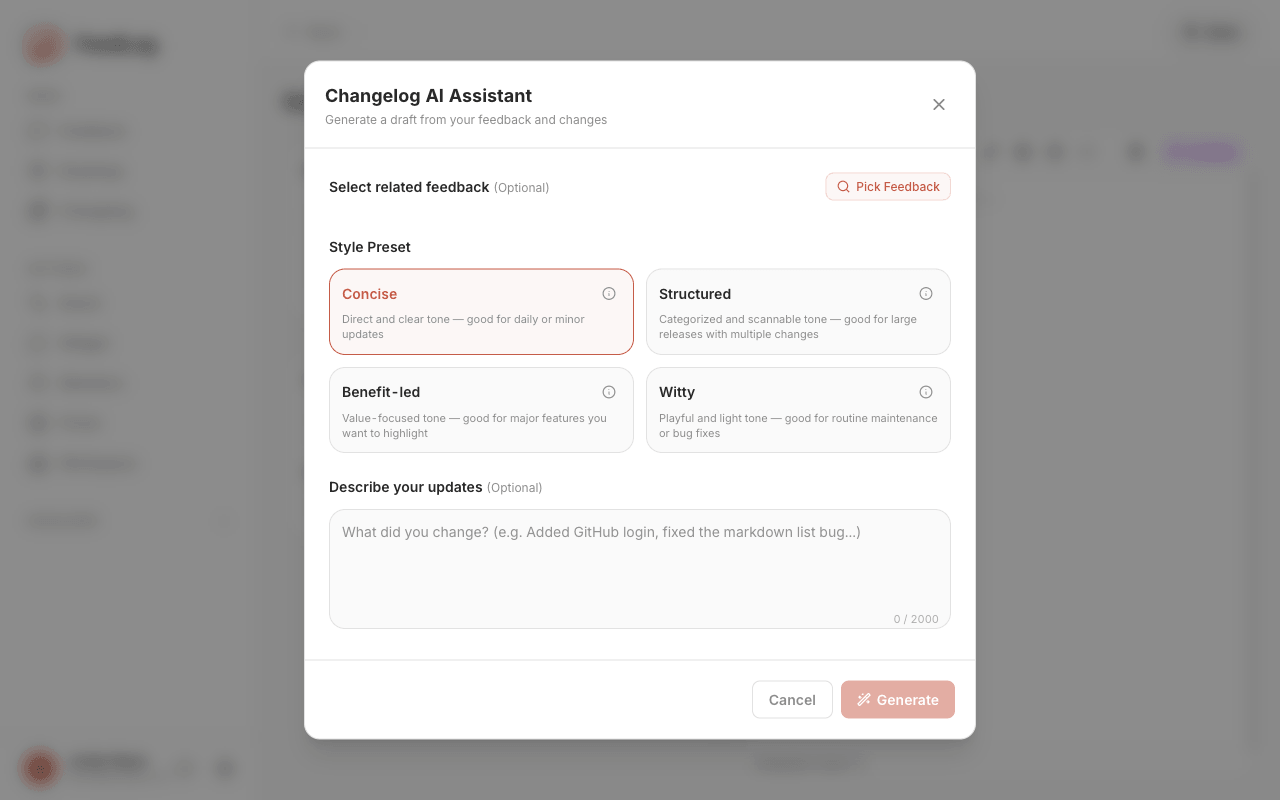
The AI Write button in the editor's toolbar opens a panel with three inputs.
Select related feedback (optional, up to 10 posts). The search uses semantic matching, as duplicate detection does, so you can search by the meaning of a request instead of its exact title. Before you enter a search, the picker lists recent feedback.
Style preset — four of them, described below.
Describe your updates (optional, up to 2,000 characters). Brief notes are enough, for example: added GitHub login, fixed the Markdown list bug. The generated draft is always in English, regardless of the input language.
You must provide related feedback, an update description, or both. The update description is the source of facts. Selected feedback helps confirm the request and suggest categories, but it is not a source of release facts. The generator is instructed not to reuse feedback wording or add benefits, reasons, or implementation details that are absent from the update description.
When a draft needs more detail, the generator may add where readers can find the change. It preserves explicit numbers from the update description. Verify these details before publishing, especially menu paths and other interface labels.
The presets differ in length and shape, not only in tone:
| Preset | What comes back | Reach for it when |
|---|---|---|
| Concise | 20–80 words. Two sentences: what readers can now do, followed by where to find it. No headings, bullets, or emoji. | A small update focused on one change. |
| Structured | 40–220 words. A short introduction followed by ✨ New, 💎 Improvements, and 🐞 Fixes sections with one-line bullets. Empty sections are omitted. | A release containing several changes. |
| Benefit-led | 60–170 words. Opens with a directly supported problem, states the outcome, and lists 3–4 available actions. The title contains one emoji. | A larger release whose user-facing outcome needs emphasis. |
| Witty | 30–80 words. One playful paragraph with no headings or bullets. It may omit specific feature names. | A short release where an informal tone fits your audience. |
Because the Witty preset may omit specific feature names, check that the final entry still communicates the information your readers need.
Generate before you write, not after
Applying a generated draft replaces the title, body, and categories currently in the editor. The cover image is preserved, but existing title and body text are not.
Self-hosted instances require OPENAI_API_KEY for AI drafting. Without it, the button reports that AI generation is not configured; the rest of the editor continues to work. See Configuring external services.
Review every generated draft before publishing. Check that it includes all important changes and that names, numbers, categories, and interface paths are accurate.
Workspace settings
Portal appearance, editing permissions and the portal address are all configured under Settings in the dashboard sidebar. The available sections are Board, Widget, Members, Portal, and one section named Workspace on self-hosted installations or Organization on Cloud. Boards and the widget have separate documentation: boards and the widget. This page covers the remaining sections and uses Workspace for both versions unless the name differs in the interface.
Branding: logo, colour and default theme
Settings → Workspace contains a General card for the workspace name and a Branding card for the portal's appearance.
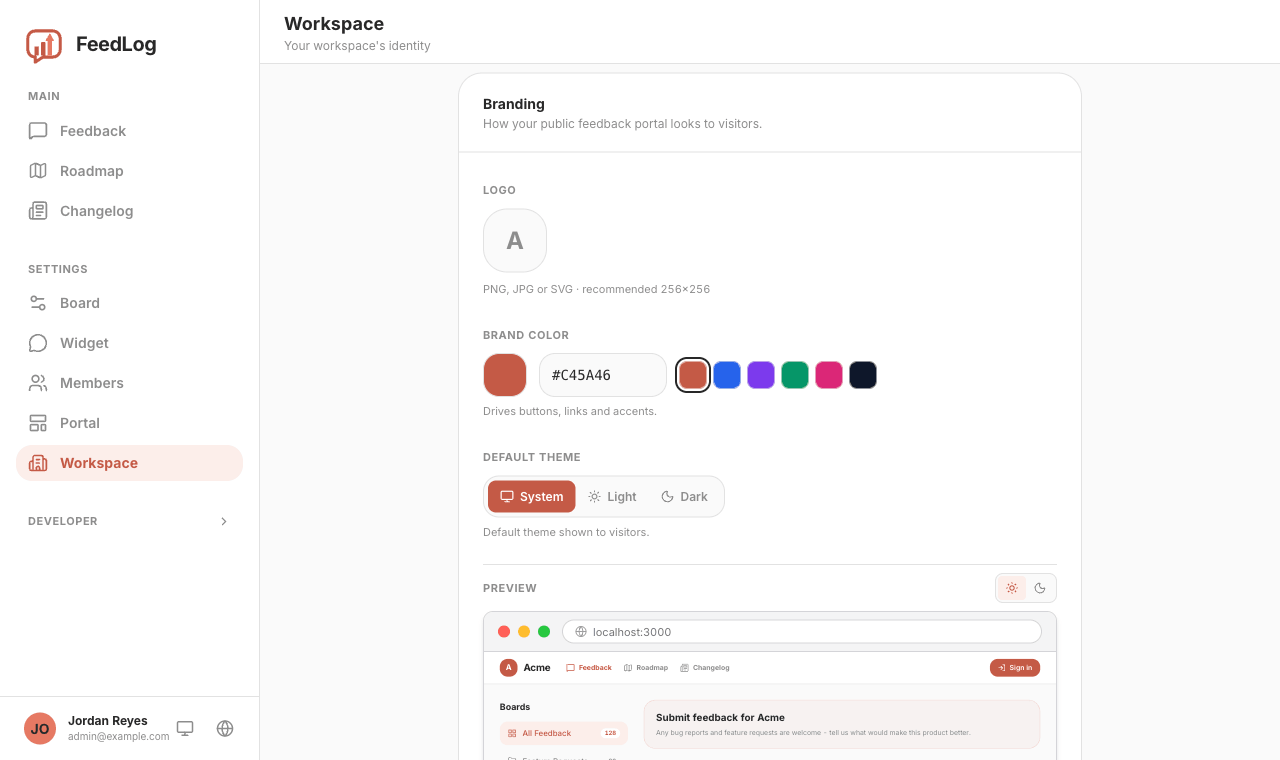
- Logo: click the tile to upload a PNG, JPG or SVG. The recommended size is 256×256. If you do not upload a logo, the portal displays the first letter of the workspace name.
- Brand colour: enter a six-digit hex value, use the colour picker or select one of the six presets. If FeedLog cannot parse the value, it uses the default terracotta colour and does not display an error.
- Default theme: choose System, Light or Dark. This setting applies until a visitor chooses a theme.
The preview updates as you edit. Its light/dark toggle changes only the preview; it does not change the saved default theme. Only Owners can edit these settings. Other roles can view the card, but its fields are disabled.
Why the displayed brand colour may differ from the value you entered
FeedLog uses the hex value as the basis of the palette and makes two adjustments.
Dark mode increases the colour's lightness. Light mode uses the hex value unchanged. Dark mode keeps its hue and saturation but increases its lightness so that the primary colour remains distinguishable against a dark background.
FeedLog selects the foreground text colour. It compares the contrast ratio of the brand colour against white and near-black, then uses the option with the higher contrast. A pale yellow button therefore uses dark text, while a navy button uses white text. The foreground colour cannot be set manually because it must remain readable against the selected brand colour.
Hover and highlight states use a lighter tone of the same hue, with their foreground selected in the same way. Backgrounds, borders and body text remain neutral grey regardless of the brand colour.
The welcome message at the top of the portal
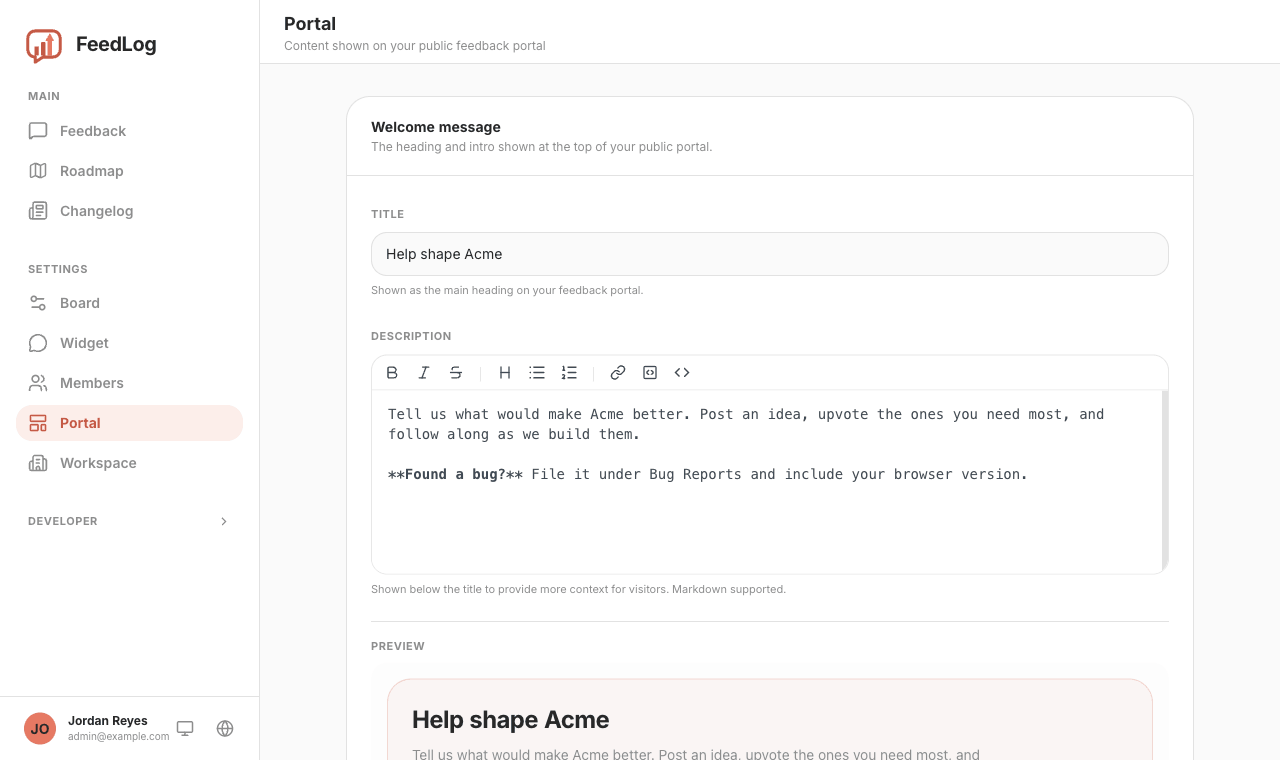
Settings → Portal controls the heading and introductory text above the feedback list. The title is plain text. The description supports Markdown and has a live preview below the editor. Only Owners can edit these fields.
Recommendation
Use this message to tell visitors which board to choose, what details to include and what happens after they submit feedback. If both fields are empty, the portal starts directly with the feedback list and displays no welcome message.
Workspace name and switching between organizations
The General card under Settings → Workspace contains the workspace name. FeedLog uses this name in places that identify the workspace, including invitation emails with the subject "You're invited to join {name} on FeedLog". Name changes take effect immediately and do not alter existing content.
A self-hosted installation has one workspace, so the card contains no other organization fields. On Cloud, it also shows the workspace subdomain. If you belong to more than one organization, use the switcher at the top of the sidebar to move between them.
Serving the portal from your own domain
By default, a Cloud portal uses a FeedLog address. You can instead connect a domain that you own. This setting is available only on Cloud because a self-hosted installation already runs on your own domain.
Enter the domain. Under Settings → Organization, enter and save the custom domain. A subdomain such as feedback.acme.com is the usual choice.
Add the CNAME record. FeedLog displays a Name and a Content value. Add that exact record at the DNS provider that manages your domain's nameservers. This may be different from the company where you registered the domain.
Wait for the status to become Active. The status progresses from DNS not configured to Issuing certificate and then Active. FeedLog checks the configuration periodically; Refresh runs another check immediately. Once the status is Active, the domain serves the portal over HTTPS. FeedLog manages and renews its certificate.
To disconnect the domain, clear the field and save. After you confirm the change, FeedLog deletes the certificate and the domain no longer serves the portal.
Common errors you may encounter
The status remains DNS not configured. First check the CNAME record. Copy the Content value exactly as shown. At many DNS providers, Name is only the label (feedback), not the complete hostname (feedback.acme.com). Add a CNAME instead of editing an existing A record; otherwise the domain continues to resolve to the previous server. If the provider offers a proxy or redirect for the record, turn it off.
The record is correct, but the status has not changed. Your provider may still be publishing the DNS change, or the previous record's TTL may not have expired. Changes commonly take several minutes. A record with a long TTL can take an hour or more. Refresh checks again immediately, but cannot shorten DNS propagation time.
The status remains Issuing certificate. This status means that DNS resolves correctly and certificate validation is in progress. The domain may show a browser certificate warning until issuance finishes. If the status does not change after several hours, check whether the domain has a CAA record and confirm that it permits the issuing certificate authority. A restrictive CAA record can block issuance without a clear error in the dashboard.
Team members and invitations
Settings → Members lists all workspace members and pending invitations.
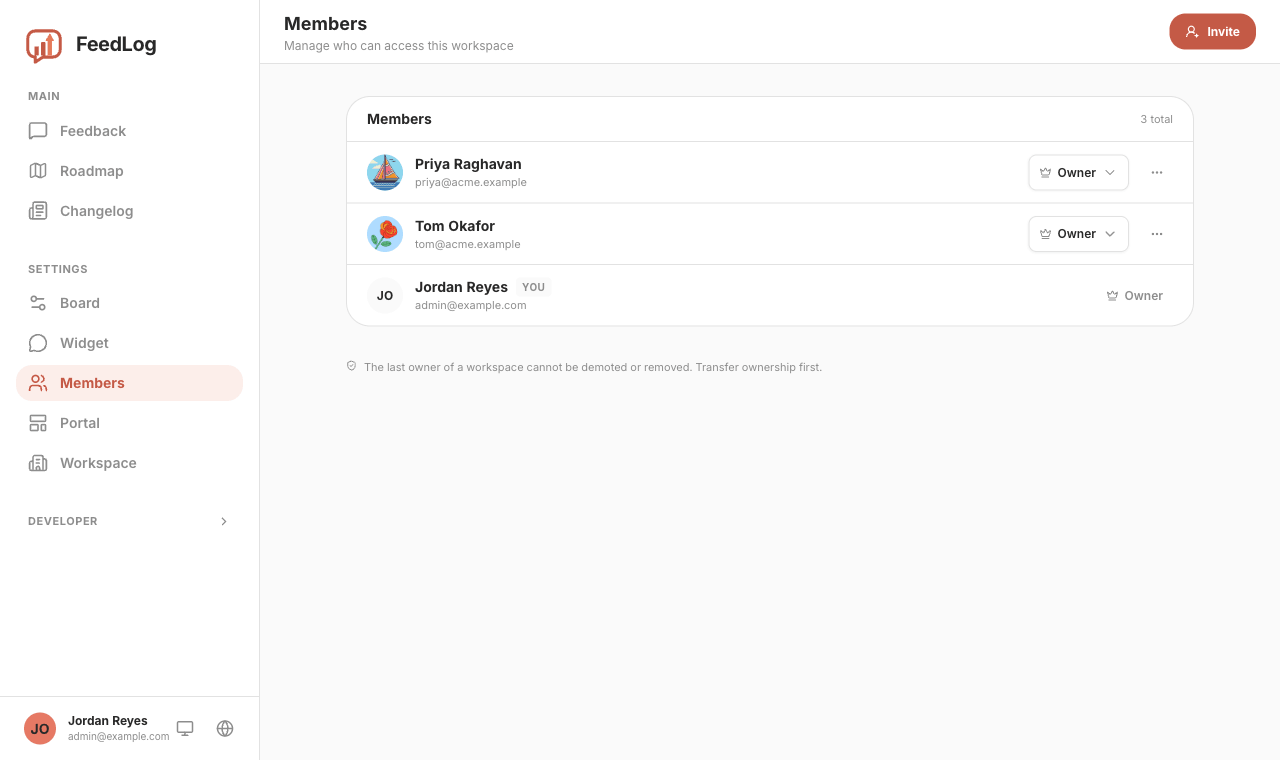
Invite accepts one email address or multiple addresses separated by commas or new lines. One selected role applies to every address in that batch. Invitations expire after seven days. Until an invitation is accepted, it appears at the top of the page with Copy invitation link and Revoke actions in its menu.
Each invitation is restricted to its recipient address. If someone opens the link while signed in with a different address, FeedLog explains the mismatch and offers an account switch instead of adding that account to the workspace.
On a self-hosted installation without an email provider, the invitation dialog shows a warning. FeedLog still creates the invitation but cannot deliver it. Copy the invitation link and send it to the recipient yourself.
What Owner, Manager and Contributor can each do
Contributor provides read-only staff access. Contributors can sign in to the dashboard, browse and search all feedback, and view roadmap and changelog drafts. They cannot edit feedback, change statuses, merge duplicates, edit boards or changelog entries, or invite members.
Manager can manage day-to-day content and settings: create, reorder and delete boards; edit and delete feedback and comments; merge and unmerge duplicates; change feedback statuses and send status-change notifications; write and publish changelog entries; and configure the widget. Managers can also invite members, revoke invitations, change roles and remove members. They cannot grant the Owner role, which does not appear in their role selector.
Owner also controls workspace-level settings: the name, logo, brand colour, default theme, portal welcome message, custom domain, SSO signing secret and promotion of another member to Owner. Branding fields remain disabled for a Manager even when that Manager can edit feedback.
The last remaining Owner cannot be demoted or removed. Promote a second Owner first. Members also cannot change their own role or remove themselves from this page.
How the initial Owner is assigned
On Cloud, the person who creates a workspace becomes its Owner. Every later member joins by invitation.
Self-hosted installations do not assign ownership to the first registered account. Owner access is initialized from the SYSTEM_ADMIN_EMAILS environment variable, which accepts a comma-separated list of email addresses. An address on that list becomes an Owner only when its account is created. Adding an address after the account already exists does not change its role, and restarting the instance does not repeat the check. To recover, add an address to the variable and register a new account with an address that has never been used on the instance. Self-hosting overview describes the complete recovery procedure.
SYSTEM_ADMIN_EMAILS initializes Owners; it is not a live permissions list. After account creation, roles are managed on the Members page. Removing an address from the variable does not demote its existing account, and adding an address does not promote an existing account.